Shed Construction
Seems like everybody wants to build a new shed. Thought I would put this page together which documents the construction of my shed from start to finish.
I did a lot of planning before I started work. Some of my considerations where:
- Easy and fast to construct by myself
- Low maintenance
- Easy to wire, insulate, and finish the inside with drywall
- Cheap -- Cost effective would be a better choice of words
- I plan to live in the shed while I build a new house so that was another consideration.
I am building in NW Arkansas. In this area there are no building codes, permits, or inspections. The insurance companies want to see a substantial building but in reality I think the only thing they look at is drywall on the interior walls for fire protection in a building used as a residence. I wanted a well-built shed so I kept the national building code in mind. In some cases I far exceeded that code but I did cheat a little where the code didn't make sense to me.

Ground breaking.

I built into a ridge so I needed a little stem wall at one end. My first time working with blocks and I made a few mistakes. Had two blocks that were too high and had to grind them down to get the top of the wall level. Second mistake was moisture comes through the wall after a long time of rain. No leaks or actual drops of water. The blocks just look damp. Not for sure what I did wrong.

Put down about 4" of base rock. Compacted it with the tractor and a thumper I rented.

Ready for concrete. Put down a 6-mill vapor barrier. 1/2" rebar on 12" centers. The rebar wasn't that much more than wire but not near as much fun to place. Down on my knees for about 10 hours twisting and tying all the rebar together. Then I had to put "chairs" under the rebar to hold it up while the concrete was being placed. Slab is a full 5" thick and has a turn down footing.

The concrete crew.
Finished slab. I got some bids to take it up from the ground to this point. Since I have a lot more time than money I did it all myself and saved about $5,000 dollars. When I got bids all of the contractors were about 3 months behind and that was another factor. The guys that did the pour and finish were one of the original bidders. They weren't the cheapest but had the best reputation. Concrete guys like a pour and finish job as they can get in and out in half a day and make pretty good money. Two winters and I have a 5' long hairline crack. I think that was because one of the concrete trucks might have had a hot load.
Probably made my second mistake here. I was considering radiant floor heat but didn't do it.

Walls going up. Built the 16' wall sections on the slab and lifted the sections up with the log forks on the tractor. With a nail gun this part went pretty fast. Might seem strange for a guy with a sawmill to build with store bought lumber but I got douglas fir with free delivery for .48 cents a BF. If I got a bad board I would send it back on the next delivery and they would credit my account. No end trimming required. I like to saw grade hardwoods and leave the construction lumber to somebody else.
If you're within a 100 miles or so of NW Arkansas check Pine Creek Lumber at Hindsville for prices. Got douglas fir from them at a cheaper price than SPF from the big box stores. Their toll free number is 1 (800) 445-6570.

A little bit unusual construction method for a shed. Has a lot of advantages and not that much more expensive.
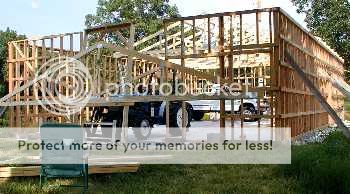
About time for the truss to start going up.

I left a 10' section out of the end wall so I could pick up the truss with the FEL and set them on the top plate.

Instead of a double top plate I used a single plus an outside purlin. Trusses all sit on top of a stud. Put hurricane clip's on both the inside and outside. The clip on the outside is a different style and is long enough to attach to the stud.

Faming nearly completed.

Tin going on. I covered the window and doors with tin and came back later and cut them out. I used screws to attach the tin. They are a lot more expensive than nails but the pro's say they are a lot better. Not really convinced that they are all that much better.

Tin work complete. I hired a crew to put the roof on as the tin on the right side was 27' long and I couldn't handle it by myself.
Could have used a 3/12 pitch on the roof but I thought 4/12 looked a little better so that is what I ended up with.

I did cut the posts and knee braces for the shed side on my mill. They are treated WRC out of old power poles.

In this area a lot of sheds are like a rain forest in the early spring due to condensation on the underside of the tin roof. I put Dow Blue Cor over the purlins. It is cheap, easy to put up, and stops the condensation. It is 1/4" thick with a R1 value and comes fan folded. Got the idea from a commercial builder who has been using it since it came out.
The trusses are on 4' centers so I don't think I could use drywall plus I certainly couldn't put it up by myself. Going to put tin on the ceiling and blow cellulose insulation in.

Working on the inside now. I put up an interior shear wall to add a little additional strength to the building. Went ahead and put insulation in it so I can just heat and cool one side if I want to.
Wiring is completed. Put in double boxes almost everyplace so I can have 4 outlets. I don't think there is anyplace in the building where you can be more than 2 or 3' from an outlet.
Got the bathroom cabinets built (picture on the woodworking page) but not yet installed. Kitchen cabinets are almost complete.
I'll add a few more pictures of the inside when I get it completed.